


 How can cavaletti work improve your dressage horse? The answer is simple: Pole and cavaletti training fosters suppleness, rhythm, increased concentration and impulsion.
The expert panel of Ingrid Klimke and Kornelia Kindermann show you how.
Original story featured in ST. GEORG and written by Kerstin Niemann
Translated by Ute Raabe / Photos by Jacques Toffi
 It seems like a paradox at first: As a dressage rider you probably picture a dressage arena and the different movements required at each level. Think rhythmic four-beat walk, a supple trot with an active hind leg, and a three-beat canter, nice and straight. To get there we commonly use transitions from gait to gait or within a gait, curved lines, circles and serpentines as well as movements like shoulder-in for more advanced horses. We all strive to present our well-trained and schooled horse at a competition and show off how well we have done our homework, and how supple, loose and regular our four-legged partner can move. But there’s more than one way to get there, and that’s where cavaletti work comes in.
Let’s be honest though – despite the fact that German role models like Ingrid Klimke or Jessica von Bredow-Werndl are well-known advocates of regular cavaletti work for their elite dressage horses – they still form the minority. There are plenty of dressage stables where you will be hard pressed to find a single pole or cavaletti. The same goes for many specialised dressage trainers. To help change this, St GEORG magazine has collated a selection of exercises, that all aim to improve your dressage training through a multitude of options. Here’s how.
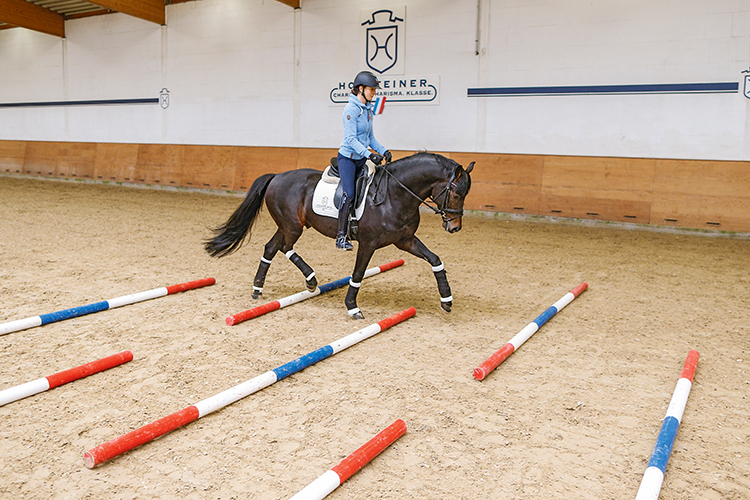
1 – MORE RHYTHM AND BALANCE
Requirements:
4 poles, 4 cavaletti or 6 poles, 4 cavaletti (see diagram below).
Tips for setting up:
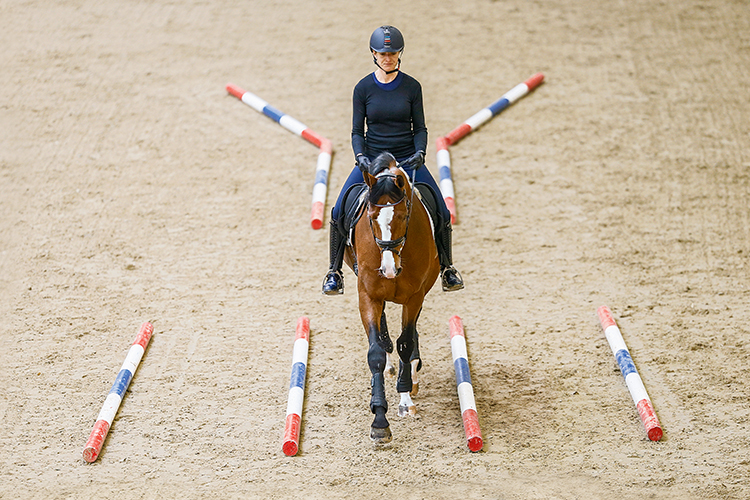
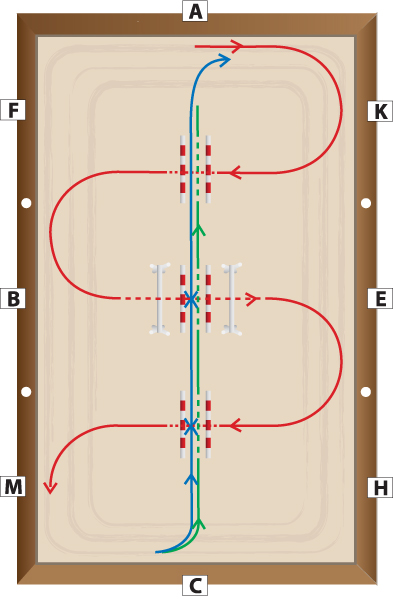
Place two poles to form an alley of 1.3 metres width parallel to the centreline, preferably at G and D. Set up the four cavaletti between B and E with a distance of 1.3 metres. Make sure the two inner cavaletti and the two pairs of poles are all in line to build a straight alley down the centreline.
Objective:
Ride a three-loop serpentine with each loop touching the long side (red line). Practise rising trot over the poles. Changing the rein this frequently engages the hind legs and the back and builds up strength. Always aiming at the centre of the pole requires horse and rider to be focused.
Options:
– After the poles ride a transition to walk and then trot on again. These transitions in quick succession foster suppleness and strengthen the hind leg.
– Ride transitions on the centreline: Ride trot-walk transitions or simple changes on the centreline between the poles (blue and green line).
– Decrease the distance between the outer pair of poles to 0.8 metres. Start with the three-loop serpentines at a walk, then trot on after the first two poles, continue at trot over the cavaletti at X, then go back to walk over the last two poles.
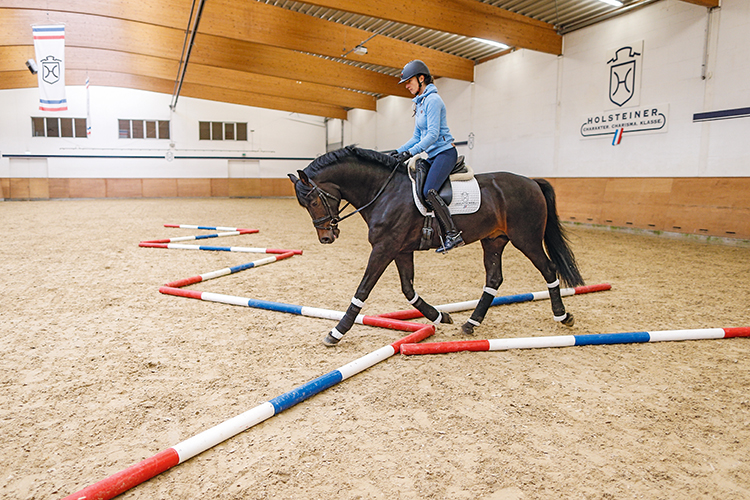
– Change the poles to form a 90 degree angle to the centreline – two poles between F and K, four cavaletti at X, and two poles at M and H. Keep all distances between the poles at 1.30 metres. This is very beneficial for both of your concentration levels as you have to maintain the same regular trot rhythm between and over the poles.
Time required for setup: 6 minutes
SURE-FOOTEDNESS – The horse’s balance is going to improve with a few cavaletti lessons as it will become more confident and adept in lifting up its front and hind legs.
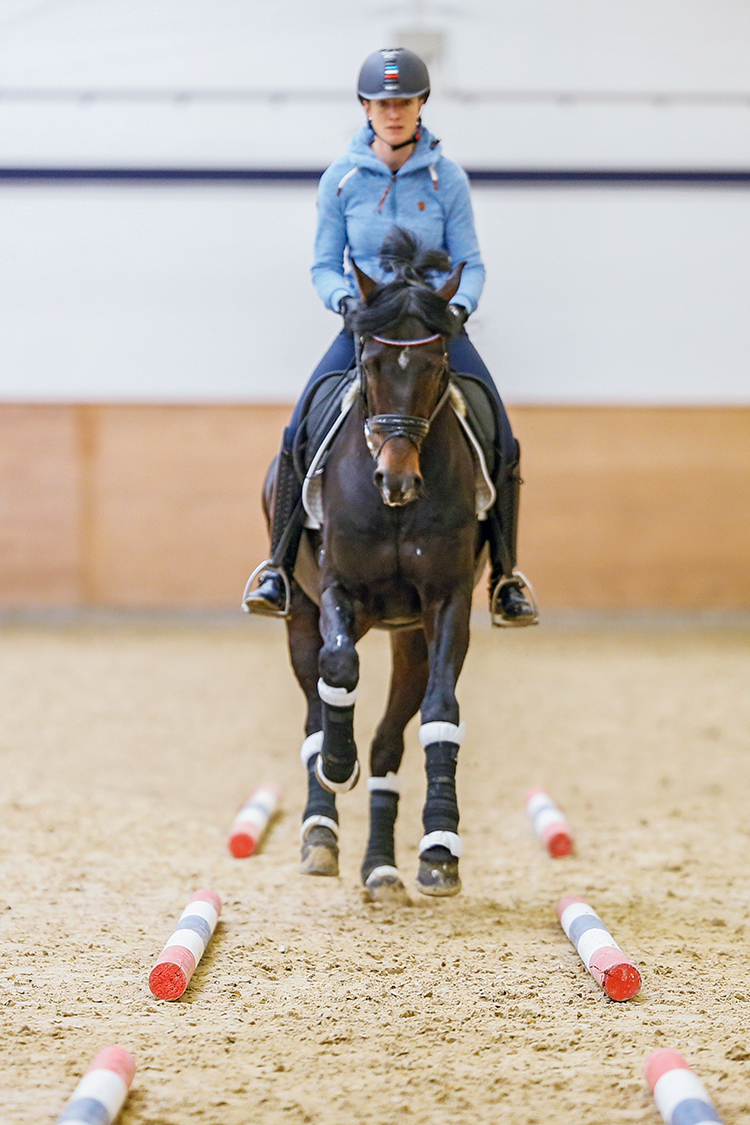
Maximum concentration and a perfect sequence, this horse is swinging through – the lesson is a success
Requirements:
7 poles, preferably long and coloured.
Tips for setting up:
First place one pole at X, at a 90 degree angle to the centreline. From there set up the next four poles, i.e. two on either side, 1.30 metres apart from X. Leave a 60-70 centimetre gap in between. Then place the last two poles on the centreline, again maintaining the 1.30 distance.
Objective:
This exercise may look simple, but it requires great awareness and focus of both horse and rider. Practise the outside line first and you will have plenty of time and room. Your horse becomes sure-footed and focused as it doesn’t have to step over a pole with each stride. Riding down the centre line over three poles is slightly more difficult, you need have the horse firmly ‘between your legs’ to stay on the line. Finally, the middle line with five poles really asks for straightness, control and correct aids by the rider.
Options:
– Start with trotting over the two poles on the outside line. The distance between these poles should be 2.6 metres, the horse will do two strides instead of one.
– Ride down the centreline. These are the three poles with 2.6 metres distances.
– Finish off with the narrow line, so that the horse trots over five poles with no in-between steps.
Time required for setup: 5 minutes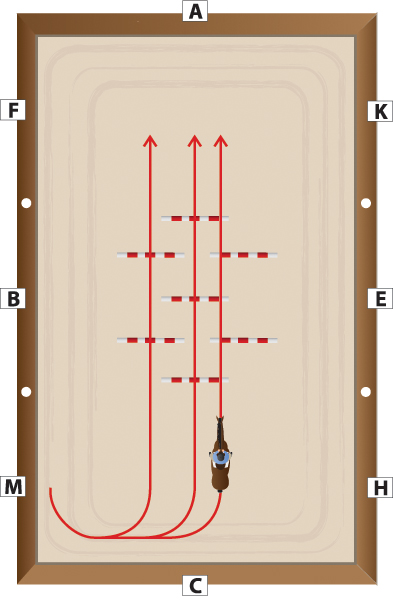
Comments by the Experts
Ingrid:
It is important to change layouts regularly to keep the training interesting for yourself and your horse. I really love that you are not trotting over a pole with each stride here, but instead are able to vary the distances. The distances are still adequate but the horse now has to look for the next pole. These exercises really make horses responsive.
Kornelia:
This was my favourite exercise! Those outside lines are very inviting during the warm up, they stimulate a swinging back and require a correct, straight approach. Riding down the centreline was the first real test for me. How well is my horse reacting to my left and right leg aid? Does it stay straight? And finally the last narrow line over the five poles, I had to place my hands wider to make it work.
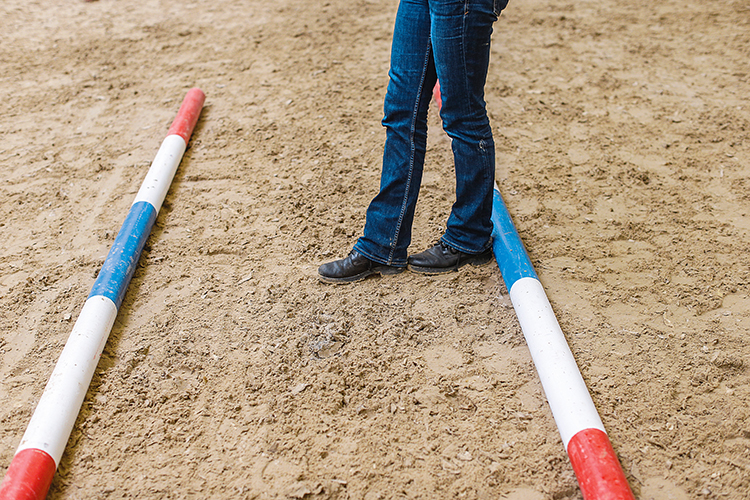
2 – THROUGH LANES AND GAPS
Requirements:
6 poles. Or 4 poles and 2 cavaletti.
Tips for setting up:
Place a pole on either side of the diagonal, 1.30 metres apart. Start at X and spread the poles evenly, so allow for the same distance to the poles at M and at K.
Objective:
This setup can be used effectively throughout the lesson and at different levels of training. Riding on curved lines combined with riding over the trot poles improves the softness on both hands. Riding on the diagonal line between the poles gives the rider the opportunity to get a feeling for straightness and test if he’s got the horse evenly on both legs. As the transitions are ridden between the poles, they have to be exact. However, don’t ask for all three transitions on the diagonal, that’s too hard.
Options:
– During the warm up ride as many curved lines as possible and trot over the cavaletti.
– Towards the end of the warm up ride through the diagonal alley and include simple walk-trot-walk transitions. You can execute these between, before or after the poles.
– More advanced combinations can also include walk to canter transitions between the poles.
– Medium level onwards: Practise flying changes between the poles. However, you might need to increase the distance to 1.6 metres to prevent the horse from stepping onto a pole.
Time required for setup: 4 minutes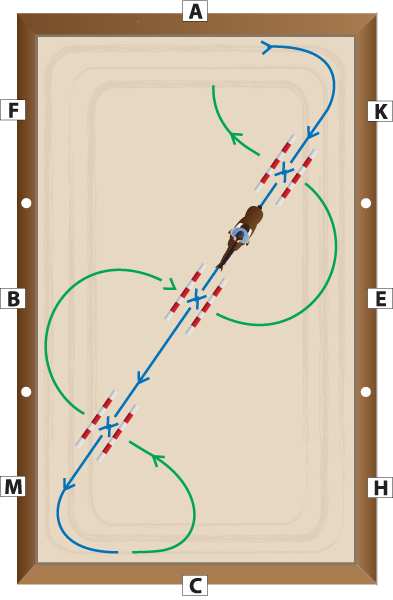
The green line is suitable for the warm up. The blue line between the poles shows where to best ride the transitions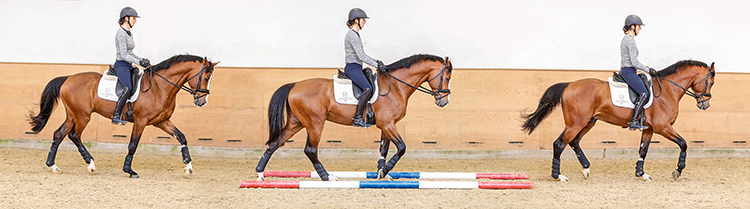
The pole alley is a simple but effective method for training transitions, such as trot-walk-trot, to become on point and straight
The optical barriers help with correcting straightness
Requirements:
10 poles. Or 6 poles left and 4 cavaletti on the right.
Tips for setting up:
Place six poles to form an alley in the shape of a one-loop serpentine on the long side. The distance between the poles should be 1.0 metre. On the opposite side set up two pairs of poles each, 1.3 metres apart, so that you can ride a half circle into the corner and out of the corner.
Objective:
The frequent change of reins will help the horse become more supple and balanced on both hands and eliminate stiffness. As you alternate between trotting over the poles on one side and riding between them on the other side your horse will learn to focus and establish a natural stride.
Options:
– Treat the poles on the long side at B as alleyways, whilst riding into and out of the corner on the other side, thus trotting over the poles. Go sitting trot in the corners.
– Include walk-trot transitions between the poles. First just one at B, then two at M and F.
– On the long side at E: Trot over the poles first, then transition to walk, then back to trot.
– For advanced combinations: Right-hand canter transition at C and proceed to canter through the pole alley on the long side (includes counter canter).
– Leave only one pole on the long side at E and ride a flying change over the pole. Practise one corner first, later both.
Time required for setup: 8 minutes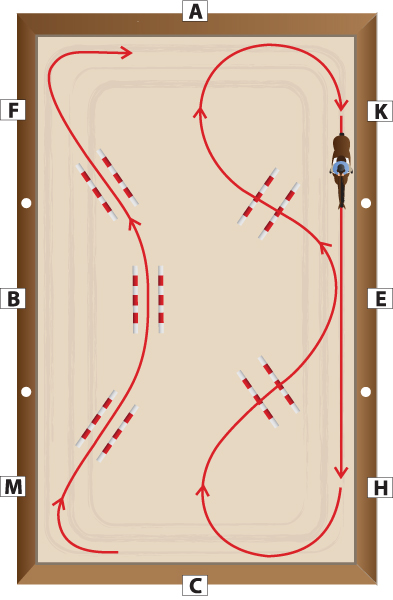
Comments by the Experts
Ingrid:
Trotting over poles on curved lines assists in establishing an even bend of the longitudinal axis. I also like utilising the gaps. Horse and rider really get to know one another here; how many metres before the poles do I need to set up the transition? They are a perfect means for self-control.
Kornelia:
These options really test your horse’s skills. The trot part is relatively easy, the canter work more tricky. You soon realise how much leg is needed to keep the horse straight between the poles.
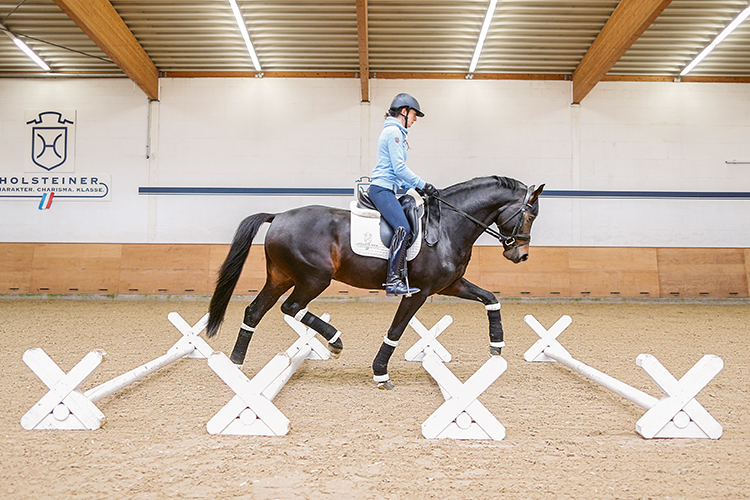
3 – TURNING AND BENDING
Requirements:
6 poles (see diagram) or 8-10 in a 20 x 60 arena.
Tips for setting up:
Form a V with two poles over the centreline. The distance from the centre of each pole should be 2.6 metres. Leave a gap of about 3.9 metres and then set up another V and so on.
Objective:
These few poles allow for a multitude of bending exercises – Goodbye stiffness! They encourage frequent and exact rein changes which in turn improve suppleness and flexibility. There is the option of riding continuous half-circles (red line), or loop serpentines as required in a dressage test (blue line). Depending on the level of training these figures can be schooled in trot or canter, with optional flying changes. Each time you negotiate the poles you increase your horse’s focus and improve its expression in the flying changes. This challenging exercise is confidence building as well.
Options:
– Instead of riding serpentines over the trot, go right along the centreline (green line). Don’t be fooled though, you need to have your horse on the leg to remain straight across the angled poles.
Tip for setting up:
To help with setting up the poles evenly, you can place two lunge lines on the arena floor to mark the centreline.
Time required for setup: 8 minutes
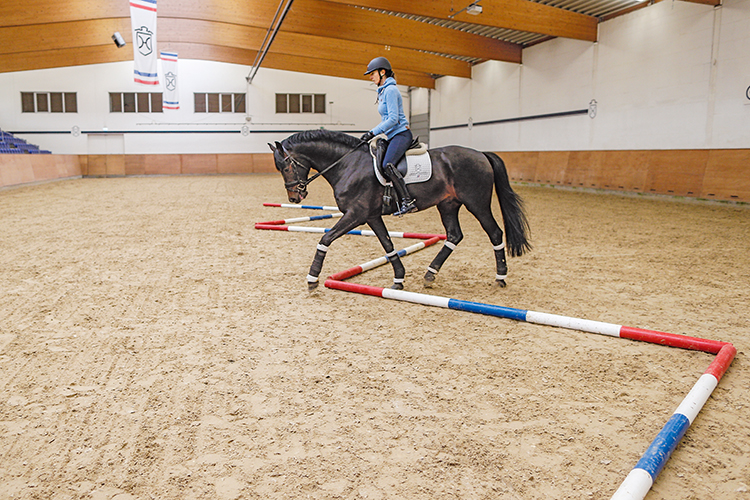
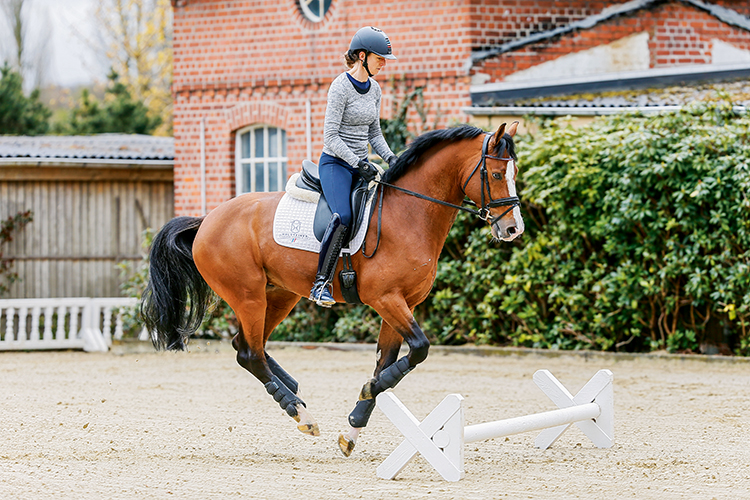
TOP: Trotting into the ‘V’ presented no problem for the four-year-old Holsteiner Damon by Damon Hill; BOTTOM: Two supporting poles make the approach onto the pointy end of the ‘V’ easier.
Comments by the Experts
Ingrid:
Each kind of serpentine is of immense value in training, whether they are executed in S-shaped loops or more straight. This set up promotes correct riding of even circles on both hands. Riding over the angled poles or the V-shape also helps with assessing distances.
Kornelia:
This exercise was most interesting. At first I found it rather difficult to keep my horse straight before the V. With two supporting poles placed as a channel towards the V the horses were able to relax and I could feel how working over angled poles can have a positive effect on suppleness.
4 – TIME TO CANTER
Requirements:
2 poles, 3 cavaletti. Bonus: the cavaletti can be placed at half-height as well.
Tips for setting up:
Place one pole at a 90-degree angle to the long diagonal, so that you are able to ride into the first corner of the short side. On the other side, set up a pole that allows for a half circle and back to the track figure. Then set up two or three cavaletti at the canter distance of 3.0-3.2 metres on the same long side.
Objective:
These options are useful for horses that experience difficulties with flying changes. The poles are intentionally placed like so, with a corner and the arena wall to follow soon after. This is great for horses that get a bit hot when practising changes. An added bonus: the poles act as a fix-point for the horse to change legs and for the rider to give the aid with minimal effort.
Options:
-The angled poles can already be used effectively in the warm up phase, both at walk and at trot and also for transitions to walk after trotting over the poles.
– Ride towards the corner to slow down a hot horse.
– The pole at F can be used to ride a flying change at the end of the diagonal.
– The combination of angled poles and cavaletti increase concentration. Please note: Practise the red line first, as the green line is more challenging.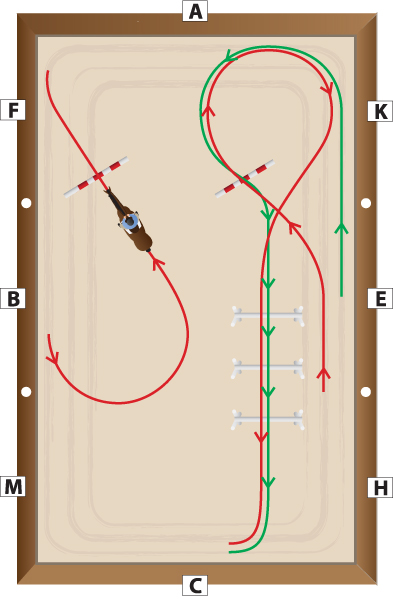
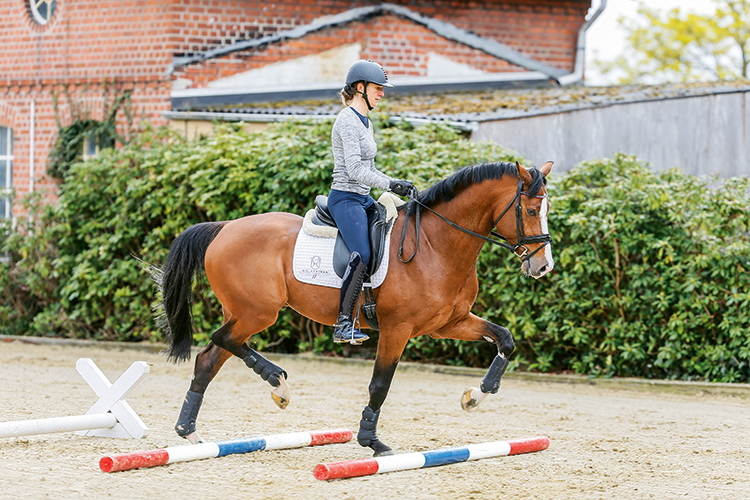
The stallion demonstrates through his active pushing hindquarters how beneficial cavaletti work can be.
Comments by the Experts
Ingrid:
Not every trainer uses poles for training flying changes. However, my experience has always been positive. The horse has to change the sequence of its footfalls in the suspension phase. Some horses find it difficult to sort out their legs quickly enough; single poles, if placed correctly, can be a remedy. But don’t rush.
Kornelia:
The canter work over poles demands a certain level of skill and balance. Not every combination will find it easy to maintain a three-beat canter rhythm, let alone practising flying changes at the same time. I suggest starting by cantering over the poles first without changing reins, that’s tough enough!
Distances and Handy Hints
Standard distances for cavaletti training:
Walk: 0.8-0.9 metres
Trot: 1.3-1.4 metres
Canter: 3.0-3.2 metres
Consider your horse’s stride and adapt the distances accordingly. Later on, the poles can also be used to work on lengthening or shortening strides, even to practise some half steps over cavaletti at half-height.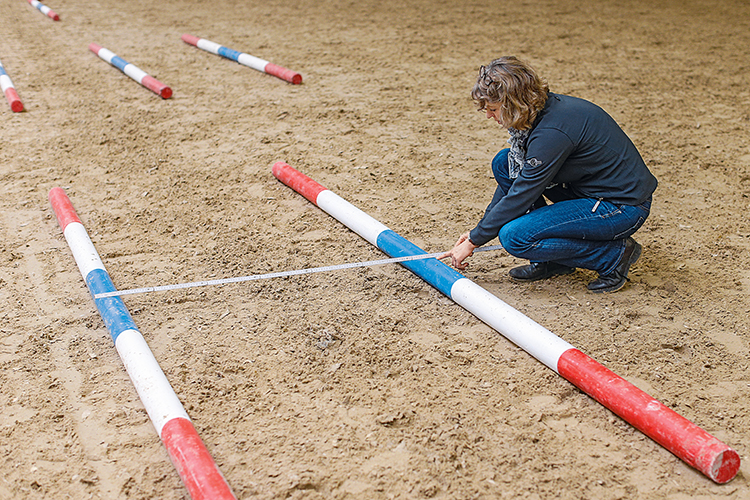
Excellent article! Once again HM is right on the money when training in a horse friendly, positve way!
A refreshing addition to the training of horse and rider. Varying the set ups will keep us both interested whilst improving our way of going.
Completely agree cavaletti work is a must,
Super article 😀
Can’t wait to get out there with some poles@@@
Love working with poles. Keeps riding interesting for horse and improves rider. Would love a book with all these patterns.
Great Pole and Cavaletti training description
Brilliant article ! Helps give some variation rather than endless circles or serpentine ☺️
WoW I am defo going to have a go thank you x