Better Balance for Better Riding – Part 1
By Lisa Champion MSc (exercise science)
Riders need good balance. Whether it’s to maintain alignment, sit a buck, stay on over a jump or use your body equally on both sides, balance is a critical part of being a good rider. Balance, both in and out of the saddle, is influenced by postural habits, muscle imbalances, tightness, current or previous injuries, body awareness, fatigue and core control. Each of these factors contributes to how well you are able to maintain alignment and stability. So, how can you tell if your balance skills are up to scratch? Try this simple test.
Balance Test
Stand with your feet shoulder width apart, preferably in front of a full length mirror. Place your hands on your hips, feeling the top of your hip bones. Now, simply lift one knee up to about hip height (see Photo 1). Check out the table below to judge your results.

Photo 1: Good Balance
Balance Test Results
| GOOD BALANCE | POOR BALANCE |
| Weight will gently shift onto support legHips will stay level
Shoulders will stay relaxed One leg balance will be maintained with ease |
Weight will tip strongly to the sideHips will become unlevel
Shoulders will tense Balance will be difficult to maintain
|
Improving your Balance
Because there are so many things to think about when you are in the saddle, improving a movement skill like balance is best done off the horse. If you want to help your body find more balance on the horse, try these exercises on the ground first!
Four key elements that influence balance are: alignment, core control, flexibility and buttock strength and control. This month, we’ll take a look at alignment, core control and flexibility. Next month, we’ll take a look at strengthening and getting better control of your buttocks – and remember, all buttocks are not created equal! Not only will these exercises improve your balance, you’ll develop greater ability to control your leg from the hip as well.
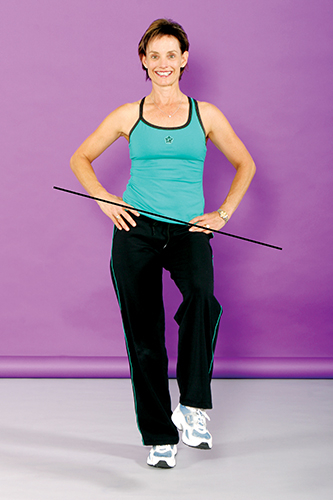 Photo 2: Poor Balance
Alignment
In order for you to be well balanced, you’ll need to get your alignment right. Stand in front of a mirror and try these easy steps:
1. Slump (let your shoulders droop forward)
2. Now arch your lower back too far (stick your bum out)
3. Now come to the middle position between the two
This is your ‘balanced spine’ position.
Once you find ‘balanced spine’ from the front, turn to the side and have a look at the alignment of your shoulder, hip, knee and ankle. If you were to drop a plumb line from your shoulder down, it should run through your hip and your ankle. Now, gently think of growing from the crown of your head, just a centimeter or so. In Riding from the Inside Out speak, I’d say, ‘Gently lift your centre dot.’ No part of your body should feel tense or tight. Do not pull your shoulders back and down, as this leads to tightness in the back, shoulders and neck.
Standing front on to the mirror again, think of your body as being on train tracks. Straight lines should run down the body through the shoulders, hips and knees.
Getting your alignment right is something you should be thinking about all day, every day. You can do the exact same exercise in sitting, so that you are not slumped, swayed or curved when you are at your desk, in your car, or anytime you are in a chair. Imprinting good alignment in sitting and standing gives your body an important message for when you are in the saddle.
Core Control
Once you have good alignment, you’ll need help from the deep (core) muscles in your body to maintain it. Your core muscles are different from your outer muscles, in that they need a strong brain connection to work well, especially if you have ever had back pain. There are lots of factors that will affect how well your core muscles work. Two of the most important are your breathing and activating your pelvic floor muscles.
To get your breathing right, think of opening up your rib cage as you breathe in. This is harder than you think! As stress and the busy-ness of life influence us (not to mention having a cold, hayfever, or asthma) our breathing becomes more and more shallow. When you first start thinking about breathing more deeply, some people hyperventilate, others breathe too much into their tummy, others tense through their shoulders and neck, others just simply can’t take a slow, deep breath. So, take it slowly. Breathe in for the count of 4, opening your rib cage, breathe out for the count of 4. Repeat several times, just to get the hang of it.
Now, to get your pelvic floor into the action (and yes, men have pelvic floor muscles too!) gently think of drawing up those muscles as you breathe out. Breathe in opening the rib cage, breathe out, drawing up on the pelvic floor muscles. This drawing up action is the key to getting your deep core muscles working. It takes some practice to get it right, but the good thing is that you can practice anywhere, anytime and no one needs to know what you are doing, except for when your eyebrows raise up as you are thinking of drawing up on your pelvic floor muscles!! So, breathe in, open the rib cage, breathe out, draw up!
Flexibility
The tightness of the muscles in and around your hip area will also affect how well you maintain alignment and hence balance. It’s the odd rider I know who doesn’t occasionally feel tightness around their hips, groin area and up into the lower back! Muscles get tight from being used a lot, poor postural habits, and tensing and holding if you’ve been in pain. So, stretch them out regularly and you’ll find an openness and freeness in your hips that is sure to help your balance and your riding!
First, a few guidelines for stretching.
– As a general rule, muscles respond better to stretching when they are warm. Doing some gentle activity or warm up a bit before you start.
– Stretch to a point at which you feel tension and a slight pulling sensation in the targeted muscle but no pain. Never bounce or force a stretched position.
– Gently hold the position for 5 good breaths. You have to hold long enough for the ‘stress-relaxation’ response to occur and the force on the muscle to decrease. •Release and then repeat. You will often find that you can go a bit deeper into the stretch the second time.
– Keep breathing! If you’re finding the stretch fairly intense, pay attention to your breath and make sure it’s not getting stuck in your upper chest, giving rise to unwanted tension in your neck and shoulders. Allow yourself to release muscle tension on as you breathe out.
Here are three stretches from the Riding from the Inside Out program that are sure to work wonders.
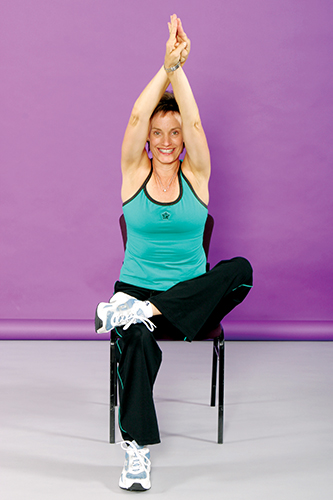 Photo 3: Sitting Hip/Buttock Stretch
Sitting hip and buttock stretch
– Sit on balanced bottom bones on the edge of a chair.
– Cross your left ankle over your right knee. Try to keep your hips as level as possible.
– Raise your arms up over your head and stretch upwards.
– Now, without bending through your back or slumping, lean forwards and upwards as far as possible. When you feel a strong stretch feeling in your hip and buttock, stop. Hold for three breaths.
– Slowly lower your arms to rest on your knees, keeping your centre dot lifted.
– Gently put your right elbow into the inside of the right knee the press down a little to increase the stretch. Hold for two more breaths.
– Repeat on the other side. With all these stretches, make a mental note if one side is stiffer than the other. If so, do an extra stretch to the stiff side.
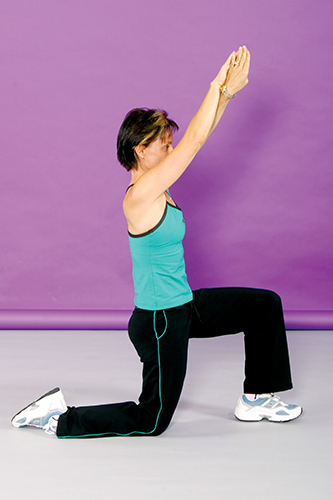 Photo 4: Lancelot Stretch
The Lancelot Stretch
– Kneel down, left leg forward, with your knees in a 900/900 position.
– Raise your arms up over your head and stretch upwards as in the sitting hip and buttock stretch.
– Now, tilt your pelvis under by imagining that your pubic bone is moving towards your nose.
– Squeeze the buttock on your right leg as hard as you can while you stretch your torso upwards. You should feel a stretch in the front of the right hip and down the front of the right leg. Hold for 5 slow breaths before repeating on the other side.
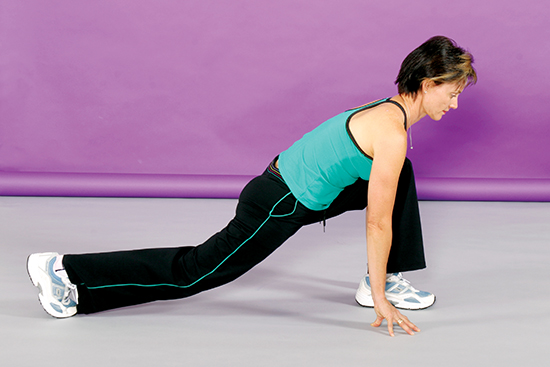 Photo 5: Psoas Stretch
Psoas Stretch
– Start as for the Lancelot stretch. Then, gently extend the right heel back until the knee comes off the ground no more than 5 cm.
– Place your hands on either side of the left foot and keep your body weight over the left leg.
– Allow the back leg to sink down towards the floor, feeling the stretch at the front of the hip. Keep extending your heel back and softening your knee down.
– Hold for 5 breaths before repeating on the other side.
Balance 101
Now that you are all stretched out, it’s time to work on the first few balance exercises. If possible, try these exercises in front of a full length mirror. It will give you valuable feedback as to how your body is compensating. The first exercise is based on the same action as the balance test you’ve already tried. Then, we just increase the challenge a little!
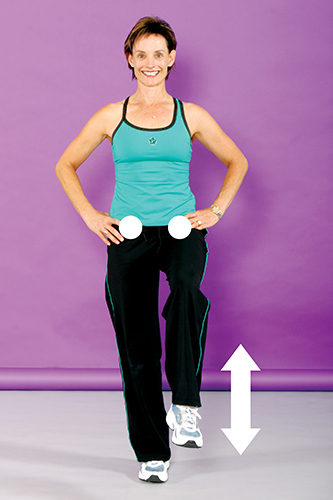 Photo 6: Standing Knee Lift
Standing Knee Lift
– Stand with both feet level on the ground with perfect alignment.
– Place your hands on your hips, feeling for the top of your hip bones.
– Imagine that you have two headlights on your hips – pointing directly forward.
– Breathe in, opening your rib cage. As you breathe out, think of drawing up on your pelvic floor muscles and then slowly lift your left leg to just under hip height.
– Hold for a moment, breathe in again and as you breathe out, press your heel gently towards the floor without allowing it to touch. Breathe in as you raise the knee back up, breathe out as you push the heel down again. Repeat this up and down movement of the leg 8-10 times. Repeat on the other leg.
– Focus on keeping your hips level and shoulders relaxed throughout the movement.
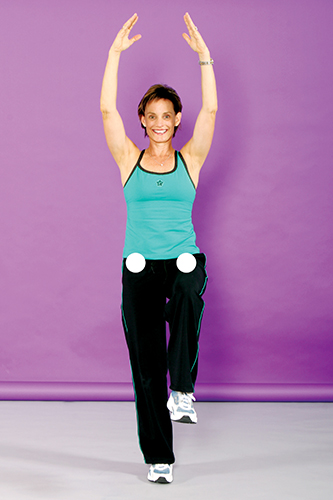 Photo 7: Single Leg Balance
Single Leg Balance
– Set yourself up exactly as for the Standing Knee Lift.
– Breathe in and as you breathe out, draw up on your pelvic floor muscles as you raise your left leg.
– Breathe in again, and as you breathe out, slowly raise your arms up over your head.
– Raise and lower your arms 4-6 times as you maintain perfect balance – always raising the arms up with the out breath and the drawing up feeling.
– Repeat on the other side
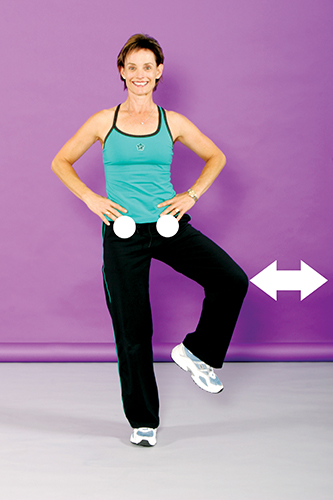 Photo 8: Asymmetrical Single Leg Balance
Asymmetrical Single Leg Balance
For the final balance exercise you again set yourself up as in the Standing Knee Lift.
Once your knee is raised, breathe in and as you breathe out, open your knee out to the side. Hold for a moment, then breathe in as you return it to the starting position. Never allow the foot to touch down, simply open the knee to the side, and return to the starting position. Repeat 4-6 times before switching to the other side. For an added challenge, combine this movement with holding your arms over your head as in Photo 8. It’s very challenging so turn your focus to your breathing and core control as you do the exercise!
These exercises can be done a few times a week if you are keen to improve your balance. You may find that lifting your foot the whole way off the ground is too challenging at first, and if that’s the case, just balance with your toe lightly touching the ground. Alternatively, you can do the exercises with one hand resting lightly on a chair, just so long as you don’t lean onto the support.
Thinking about your alignment and breathing can, of course, be done all day/everyday and it’s a great way to start perfecting how your body moves, both on and off the horse.
There are more articles with Lisa, right here: