

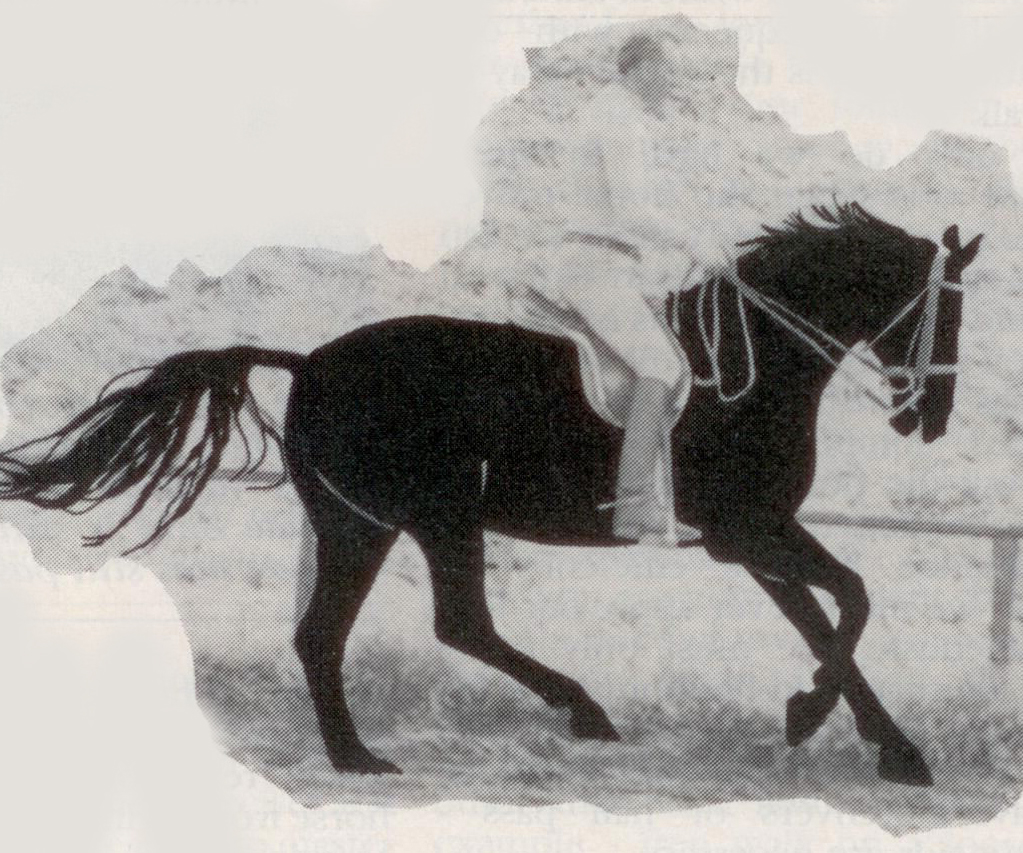
 Perhaps there is no single term in riding so used, so abused, and so confused as the expression: Half Halt! Most experts agree that the Half Halt is the building block of riding, an indispensable first step in the education of any horse – but they all seem to find it hard to explain exactly what the rider should do to perform a Half Halt. We asked German trained, dressage expert CHRISTIAN THIESS to shed some light on this most important, and most puzzling, of the equestrian skills…
To become a rider it is not enough to be able to sit elegantly on a horse. Even a good seat and balance does not make you a ‘rider’.
To be able to ride you must be able to influence your horse and to extract the best performance from him.
Any horseman will tell you that you cannot force a horse to perform. That only produces resistances and tensions. It doesn’t matter what the discipline, whether it’s campdrafting, showjumping, polo, or dressage, a horse that is punished unduly will be out of harmony with his rider and inferior to the correctly schooled animal.
Riding is all about communication, about building up a rapport with your horse so that he willingly gives of his best. Top riders have a ‘language’ through which they communicate with their horse, a series of signals that produce the desired response. In Classical Equitation, the fundamental of that language, the very alphabet of riding, is the half halt.
Applied correctly, half halts can be like magical buttons – they can literally transform a horse’s performance into one of lightness, ease and elegance. Tense, nervous, confused horses can be transformed into willing and calm individuals, while lazy ones can suddenly produce a forward urge and activity that amazes their riders.
I am convinced that anyone with a little talent, intelligence, will and coordination can learn to ride and use these ‘buttons’ if he is taught correctly. But, in my twenty years experience as a riding teacher, I have found the half halt is surrounded by more confusion and misunderstanding than any other riding expression.
more follows
I have met very few riders who know how to apply a correct half halt, and feel confident with its application. The majority of riders seem vague and uncertain about its use.
Top American rider Kay Meredith’s dialogue in Dressage and CT expresses the situation well: “Honestly Suzie, when it comes to half halts I really don’t know if I have actually ever done one.”
Whereupon Suzie replied: ”I’m in the same boat with you, I just keep trying and hope it will come to me one day.”
And Suzie can keep trying for another one hundred and fifty years… how can she ever expect to master the half halt when she doesn’t have a clear understanding of what she has to do to achieve it?
Is the half halt doomed to be surrounded by mystery?
Not at all!
In this article I have tried to clear the confusion. When the half halt is stripped of its mystery, it is shown to be a very simple combination of basic aids. When these aids are coordinated correctly and applied at the right moment, they have the potential to create – almost magically – balance, rhythm, impulsion and harmony.
If you are prepared to read carefully and to work diligently on the practical exercises, then you too will be able to master the alphabet of riding and use it to create your own magic.
Half Halts or Parades?
I believe that one of the reasons the half halt generates so much confusion amongst English speaking riders is the very expression itself … ‘HALF HALT’. It can give the impression that the aids required to achieve the half halt are the same as those for an uncompleted halt. This has resulted in some riders exaggerating their aids, interfering with their horse’s movement and sometimes even destroying the forward urge. When this happens it is not surprising that some people condemn the half halt as being damaging to the horse’s preparation. But, to be fair, they should only condemn the badly trained riders who cannot apply their aids.
Correctly coordinated half halts, while bearing a similarity to the aids for halt, are different again, and there should be no confusion between the two terms or their correct application.
In most European languages the French term – Half Parade – or simply, Parade, is used, and riders do not seem to have the same confusion between ‘half halts’ and ‘half-a-halt’ … the term for halt is ‘full parade’. So let’s take away a big chunk of mystery right now by talking about the parade instead of the half halt.
Forget about any confusion, problems, or psychological blocks that jump into your head as soon as the expression ‘half halt’ is mentioned. Let’s think about parades instead. This might be a new word in your vocabulary, but it’s going to be a nice, easy to understand one that will help your riding immeasurably. Use it with confidence.
more follows
What is a Parade?
It is a nearly simultaneous, coordinated application of the rider’s leg, seat and rein aids. Three aids are featured: Leg, Seat, and Rein.
Let’s look at each aid’s influence on the horse separately, then combine the effect of the simultaneous application and we’ve got it… A PARADE!
LEG AIDS
It is important that the rider’s right leg can only influence one part of the horse directly. And that is the horse’s right hindleg.
As a rider you cannot influence your horse’s forelegs or his left hindleg when you apply your right leg aid. You can only directly act upon his right hind.
Why is this? When you apply your right leg on your horse’s side, it contacts the horse’s right abdomen muscles. The abdomen muscles are in connection with the horse’s right hindleg muscles, and therefore the aid acts upon the right hind. It causes the leg to bend further under the horse’s body, engaging either forward or laterally, according to the rider’s command.
Similarly, your left leg can only directly influence your horse’s left hind. You cannot directly act upon his forelegs or his right hind with your left leg.
This explanation is very important. If you understand it you have made a big step forward in mastering the parade.
REIN AIDS
Now let us analyse the effect of the rein aids. Providing your horse is accepting the bit correctly, when you apply the right rein aid, you directly act upon – through the horse’s body – the right hindleg. You cause the right hind to bend more.
You cannot directly influence the horse’s forelegs or his left hindleg with the right rein aids. You can only act directly on his right hind.
In the same way, the left rein aid only directly influences the left hind, and not the forelegs or the right hind.
For the rein aids to be effective, the horse must accept the bit without resistance. If the horse does not willingly accept the bit, then the rider’s aids will not be effective. For example, if the horse comes above the bit, the influence of the rein aids become blocked at the poll. The aids will fail to flow through the horse’s body and the connection with the hindlegs will be interrupted. When the horse comes above the bit, he hollows or flattens his back, which aggravates the interruption. The effectiveness of the aids is also disrupted if the horse opens his mouth, puts his tongue over the bit, tilts his head, leans, pulls, or comes behind the bit.
SEAT AIDS
The seat and weight aids are supporting aids. They support either a leg or rein aid, or both. Don’t underestimate their significance though. They are important aids, especially in the fine tuning of advanced horses. The leg and rein aids will fail to achieve their full effectiveness without the support of weight and seat.
more follows

COORDINATING YOUR AIDS
Now we have looked at each aid separately let us return to the parade. You should now clearly understand which part of the horse you can directly influence with your aids. From this, it is easy to see that you can apply a parade on the right side to influence your horse’s right hindleg, or a parade on the left side to influence his left hindleg. Effectively then, we have two parades, the parade on the right side and the parade on the left side.
I want to re-emphasise that the parade is a nearly simultaneous action of leg, seat and rein aids. The leg and seat must always be predominant, and in coordination with the rein aids, which will follow a split second later.
The most important point that is seriously overlooked in the practical application of the parade is that there is a correct moment to apply the aids and an incorrect moment. The parade must be applied in coordination with the horse’s movement.
In rising trot – providing the rider is on the correct diagonal – he is rising out of the saddle when the horses’s inside hind is leaving the ground. This is the correct moment to apply the inside parade to effectively act on the horse’s inside hind leg, causing it to bend more and step further under the horse’s body mass.
It is not enough to ride vaguely round the arena and haphazardly apply leg, seat and hand when you think you need to. You may be in for a nasty surprise because if you apply them at the wrong moment they can work against you.
So when is the correct moment to apply the parade?
To answer that question let’s look again at the fundamental reason for using the parade. We want to engage the horse’s hindlegs more, make them bend and step under his body. So we must apply our parade just when the horse is lifting his hindleg off the ground. This is the moment when we can effectively influence the horse’s hindleg. Your leg aid, supported by your seat, can push his hindleg more under his body and engage it. Your hand, supported by your seat, bends the hindleg more.
We must apply the parade on the right side when the horse’s right hindleg is leaving the ground and coming forward under his body. Similarly, we must apply the left parade when the horse’s left hindleg is leaving the ground. Only if you apply your aids at this moment will you be able to come through and influence the horse beneficially.
If you apply the parade at the wrong moment, which is when the horse’s hindleg is on the ground or is just coming down to strike the ground, you will have no worthwhile influence. Indeed, attempting to influence the horse at the wrong moment may make things worse! Your horse may respond to your badly timed aids by pushing his hindleg muscles groundwards. As the hindleg muscles are connected through the back, neck, poll and mouth to your hand, he may use the ground’s support to push against your hand, give resistance and come above the bit. This not only wastes energy but it will strain the horse’s hindlegs and back unnecessarily and encourage heavy movement instead of lightness and gaiety.
However, if you apply the parade at the correct moment, when the horse’s hindleg on the appropriate side is leaving the ground, your aids will not meet any resistance. This is because at this time the horse has not got the support of the ground to be able to push against your hand. The next moment, when the hindleg comes on the ground and the horse can resist, is the time for you to give. You cease to apply the leg pressure and relax the rein aid. The horse will find nothing to push against and so will not give resistance.
As the horse’s hindleg leaves the ground again, you can apply the next parade on that side and so on. As the horse’s right hindleg lifts off the ground, apply right parade – where the rider literally drives with leg and seat into the hand; the horse’s right hindleg returns to the ground, give with the right hand, and cease to apply -active right leg and seat aids.
In canter the correct moment is as the horse’s outside hind leg has just left the ground, as it propels further forward under the horse’s body, that is the moment when the rider will instinctively apply an outside parade. Note that the rider’s seat is pushed forward in the saddle. Now is the correct moment for you to begin to apply the inside parade to act on the horse’s inside hind leg.
Notice that I have never mentioned applying a left parade and a right parade at exactly the same moment. It is of course wrong to do this, although some instructors encourage it. You must apply alternate aids because the horse moves his hindlegs alternately. You can only beneficially influence the right hind as it comes off the ground. There is a different moment then, when we have to influence the left hind. If the horse moved forward in bounds like a kangaroo with both legs leaving the ground at the san1e time, it would be logical to apply our aids on both sides together, just at the moment his legs sprung off the ground. But we are riding horses, not kangaroos. We must coordinate with the alternate strides by applying alternate aids.
The strength of the parade needed to be effective varies from horse to horse. Some animals need stronger parades than others. A correctly prepared advanced horse will respond and engage with the lightest application of the aids – a slight contact with the leg, very careful seat aids, and a quiet ‘catching’ of the impulsion created with a calm hand.
On many horses too strong aids can be detrimental and encourage resistance and muscle strains. The parade is not about forcing horses, or pulling them together. It is about communication. It is about being able to influence horses so the rider can engage them, create impulsion and lightness while remaining in total harmony with his mount.
The strength of the parade required may also vary from time to time on the same horse. How much leg and seat in proportion to hand aids can also differ from horse to horse and in different circumstances. The most important thing to remember is that the leg and seat must always be predominant. The hand should never be stronger. If you ever need to use very strong taking rein aids (for example, if the horse is very resistant or disobedient) the leg and seat must still be dominant.
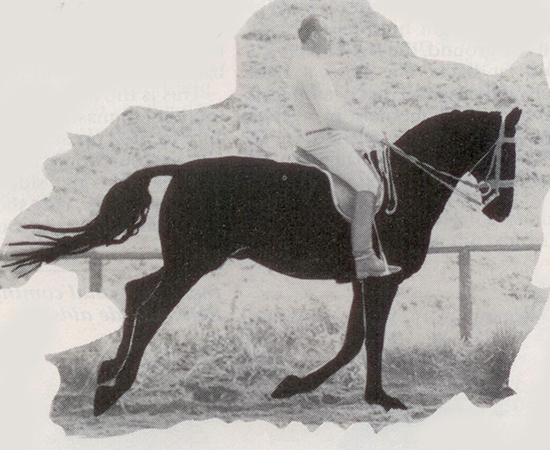
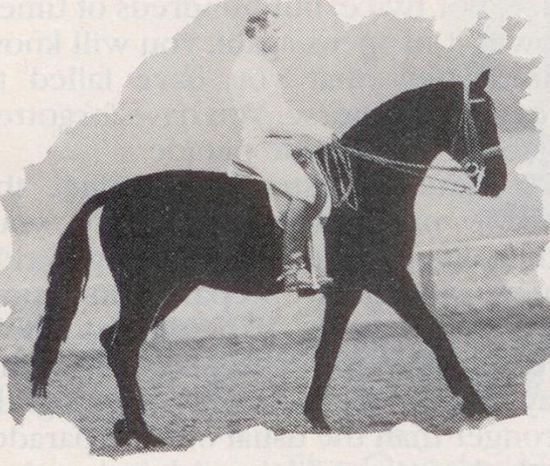
Inside hindleg is just leaving the ground along with the outside foreleg. Outside shoulder is moving forward. Outside shoulder is moving forward. Time to begin to apply the inside parade to engage the inside hindleg. Support the parade with the outside rein aid.
Inside diagonal coming to the ground. Relax the aids.
But don’t go to the opposite end of the scale and fail to apply sufficient hand. In this case the horse will not bend his hindlegs, will fall on his forehand and increase his speed. There must be a precise balance between the amount of leg, seat and rein used in the parade appropriate to the horse and the situation. Every disruption of the balance, whether it is too much or too little of one aid in proportion to another, will cause the parade to be ineffective and will be expressed through a disruption in the harmony of the horse’s paces.
It is not correct for practical explanations to be cloaked in mystery, or for instructors to hide the answer to a rider’s problems in the vague reply that they must ‘feel’ the movement. Such an answer only shows the limits of the trainer’s knowledge and ability.
Of course, acquiring ‘feeling’ is a precondition to becoming a good rider but in what activity is this not the case? Can a carpenter complete his trade without feel? Or a piano player, a car driver or an author?? They can’t. But they were not necessarily born with the feeling for their specific trade. Feeling can be obtained, improved and refined. Sometimes it can reach the level where it is developed to perfection and the person becomes a master or an artist in his specialised discipline. But to become a master you require talent and a correct development and assimilation of the skills.
There is good news here! Everybody can learn the riding skills properly and become skillful providing he is taught correctly. Whether the person is then able to transform the skills into an art depends on his individual talent and dedication. To become a riding artist will require a lot of feeling, but until you reach this level it is necessary to learn, master the skills, improve, and develop the potential for feel.
Let’s look at how a piano player learns. First of all he has to become familiar with the musical notes and do lots of scales. It is important to have a good teacher who can clearly explain, demonstrate the techniques, make corrections and provide encouragement, but it is not enough. Every day for hours each day, until days add up to years, the student must work on the scales.
And what are these scales? Nothing but exercises designed to provide the pupil with the best opportunity to learn to coordinate the notes and to develop feel for tact, rhythm, tempo and harmony. Gradually the skills improve – and according to how much talent he has, and how hard he has worked, he will have the ability not only to play with rhythm and tact but to express magic in his music according to the feel he has developed.
It is possible to learn to play the piano by ear. A very talented person, through trial and error, can develop skills and may be able to play a large variety of melodies even though he is unable to read music – but he will always be limited. But if you ask the piano player, ‘What are you doing? What notes are you playing?’ – he will have to confess his limitations.
Certainly the ear is very important in music, just like feel in riding … but it is not enough if the musician seeks to obtain a higher level. A thorough grounding in correct skills is also required, along with years and years of practice to perfect them.
It is the same with riding.
If someone is very talented, they can make progress in their riding through feel alone, especially if they have the opportunity to spend a lot of time in the saddle. Through trial and error it is possible to be able to do lots of things with horses, but riders who rely only on feel will always be limited.
Someone may ask a rider who has learnt by feel how he influenced his horse at a particular moment, and the rider will have to reply that he doesn’t know. He just felt it and did it. It is a great pity when such riders begin to try and teach others. Perhaps they have had some competition success to gain popularity, but without correct preparation and thorough understanding of the problems in riding, they cannot clearly transmit knowledge and help others. It is not surprising that their students are confused, and that some riders never have the possibility of mastering the half halt.
Feeling is involved but first you must have a clear image of what a parade is. You must have a thorough understanding of the theory as well as what is physically required to be able to put it into practice. You must learn the alphabet and the basic skills first, before you can read and write.
Let us now look at the exercises that will help you master the correct application of the parade. But first a warning: if you are an experienced rider, you must try and forget many of your established habits. Imagine you are like the piano player who can only play by ear and now has to learn the notes. Your feeling and experience will help you, but you must try and learn with the open mindedness of a beginner.
Work through the exercises every day concentrating on coordinating the aids in time with your horse’s movement. Be diligent, and work hard each day at all the paces. You can practise when out on a hack, or doing fitness work on your event horse, or schooling in the manage… or anywhere!
EXERCISE 1
Begin at medium walk on the right rein on a big circle. The aim of this exercise is to apply a parade inside (right parade) every stride in coordination with the horse’s movement. Keep a firmer contact on the outside rein (firm, but still elastic. Nothing in riding should ever.be rigid). Place your left outside leg behind the girth to help maintain the bend and, for the moment, forget about the outside aids. Concentrate only on the inside ones.
You need to apply the right parade just as the horse’s right hindleg is leaving the ground. How can you find when this moment is? I can imagine that you haven’t got eyes on your bottom to see this. The answer is you have to feel through your seat as the horse is lifting his leg.
But what if you can’t? What happens if your seat feeling is not developed enough yet? How can you find out the right moment and check that you are correct?
The answer, fortunately, is simple. You can find out what the horse’s hindlegs are doing by looking at the horse’s shoulders. You know that the walk is a four time pace. Beginning with the left hind, the sequence of footfalls is (1) left hind, (2) left fore, (3) right hind, (4) right fore. The timing is very precise. As one hoof is coming off the ground, the next is back as far as it can go, just ready to be brought forward as well. So as the right hind leg is being lifted off the ground, the right foreleg is extended far back. The horse’s right shoulder will also be back and it is possible to see this moment by a short downward glance. Now is the time to apply the right inside half halt to influence the right hindleg.
Apply right leg and seat followed immediately by right hand together in short, crisp coordination. Then immediately relax the aids. They must not be long and drawn out or the horse will have his right leg back on the ground before you have finished and will be able to offer resistance to your clumsy aids.
As the horse’s right shoulder comes back to its extreme position in the next stride – to indicate the right hindleg is leaving the ground again – apply the right parade a second time. Practise in this way, over and over again, every stride. Little by little you will master the timing until you do not need to glance down to see the shoulder. You will begin to ‘feel’ the movement through your seat. You will know without looking when the moment is right to apply the parade. The coordination will become rhythmic with the timing of the horse’s stride.
Change the rein through the circle and repeat the exercise to the left. Now you will apply the left inside parade. The horse’s left hindleg will be leaving the ground when his left shoulder is back as far as it will go.
This is the first step and will not take too long to master. Soon you should be able to pick up at walk as soon as you mount your horse and begin to apply parades on one side without even looking down. You should feel when the moment is right. Don’t be afraid to check the shoulder occasionally though, just to see that your feel is correct.
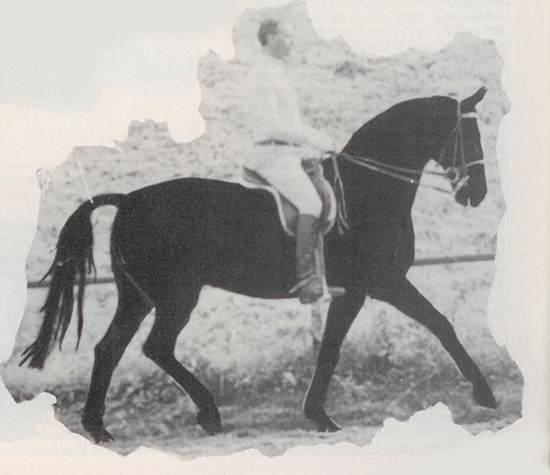
Outside hindleg has just left the ground. At this moment the rider will automatically begin to apply an outside parade.
Inside hindleg leaves the ground a split second after the outside hind. The rider’s seat is pushed forward in the saddle by the thrust. Now is the time to begin to apply the inside parade.
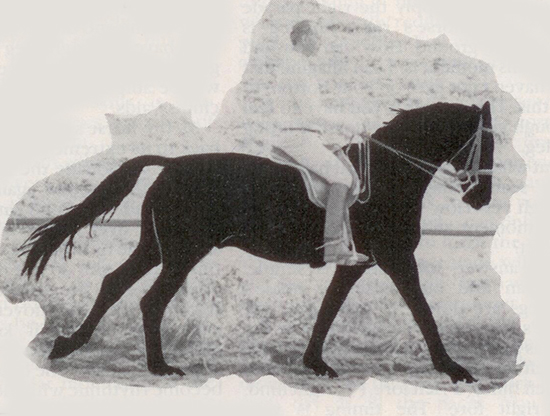
Inside parade reaches its full intensity…
…resulting in the inside hindleg bending under the horse’s body…
…towards his centre of gravity.


EXERCISE 2
Ride on the circle to the right at sitting trot. The aim of this exercise is also to apply a parade inside in coordination with the horse’s movement. However, it will be more difficult at trot because the horse is moving faster.
Again, pick up an elastic, firm contact with the left outside rein. Place your left leg behind the girth, just as you did at walk, and forget about your outside aids.
You need to apply the right inside parade just as the horse’s right hindleg is leaving the ground. But how do you know the moment if your feel is not sufficiently developed yet? Again, the answer is simple. You need to look at the horse’s shoulders.
The trot is a two time pace. The horse’s legs move in diagonal pairs… left hind and right fore together. Just as the horse’s right hindleg is coming off the ground and you need to apply the right parade, the horse’s left foreleg will also be moving forward. You will see this by glancing at the horse’s left shoulder. It will also be moving forward. Now is the moment to apply the right inside parade.
Apply the aids inside, relax them, and then as the horse takes his next stride and his right hind leaves the ground again, apply them a second time. Practise in this way each stride. Try not to look down too much and do not alter your upper body position. Restrict looking down to a short glance with your eyes only, and try the rest of the time to ‘feel’ what is happening.
Change the rein and work to the left. Then work on several consecutive rein changes, swapping between parades on the right side, then the left. Work on straight lines too. You can practice anywhere and do not have to restrict your work to the manage.
But I must warn you. It is difficult to master the inside parade at trot. Don’t expect to get it right the first time you try. If you are very keen and determined and work daily it will still take approximately eight months to establish. The less determined rider will need around one to two years, and anyone who lacks will and determination will probably never get it completely right. Hard work will be rewarded fairly, so maintain your enthusiasm and you will come through.
EXERCISE 3
The third exercise is to learn to apply the parades at canter. So far at walk and trot we have concentrated only on applying the parade on the inside. This is to simplify the exercises while you are just beginning to master the coordination.
If you tried initially to apply both inside and outside parades you would probably become so confused and disheartened that you would screw this article up and wish you’d never seen it. The reason we concentrate on the inside parade to begin with, and not the outside, is because it is easier to influence the horse’s inside hind.
The curve of the circle makes it easier to push the hindleg further under his body, to bend it, and make it carry more weight – in other words, to gymnastic it.
However, to be as effective as possible, a rider has to be able to half halt inside and outside. The outside parade is important too, not only for engagement but to prepare for all transitions and new movements, and to ride balanced corners and curves.
The easiest pace to apply the parade outside is at the canter.
The canter is a three time movement with a moment of suspension. The sequence of footfalls is (1) outside hind, (2) diagonal of inside hind and outside fore together, (3) inside foreleg. To be able to apply the parades at the correct moment we must understand exactly what the horse’s hindlegs do. They move off the ground almost at the same time, but not quite, as the outside hind leaves first. Because of the rolling movement of the canter, it is easier to coordinate the parades.
Put your horse into working canter on the right lead and circle. Establish a good rhythm with your horse on the bit and your outside leg correctly positioned just behind the girth.
If your horse is accepting the bit (including the outside rein) you will automatically be applying a parade outside at the correct moment. The rocking movement of the canter facilitates the application of leg, seat and rein just as the horse’s outside hind leaves the ground. It is as simple as that!
Ride round on the circle and concentrate on feeling the parade. Of course, the precondition is that your horse is going correctly. 1f you have a horse who is difficult to ride, try and beg, borrow or steal a better behaved mount to practise on. Then, once your feel and ability to influence is better developed, you can go back to your original mount and use the correctly coordinated aids to .influence him to go better.
Unfortunately, the inside parade is not so easy. You will have to learn to apply it through a conscious effort. However, as the inside hind is the leg you can gymnastic best, it is important to master the parade.
If you can feel through your seat when the horse’s inside hind is leaving the ground, then you will know the right time to apply the parade. If your feeling is not yet developed sufficiently then you will have to use a different method until you can feel. At canter your seat is pushed, by the horse’s motion, into a slight sliding movement from the rear to the front of the saddle.
Ideally your seat should not be displaced by this motion, but as you ride canter, you will be able to feel the movement. As the horse’s hindlegs leave the ground the propulsion pushes your seat forward. During the moment of suspension and as his legs come down, your seat slides back.
So the correct moment to apply the inside parade is when your seat is most forward in the saddle. This is when your horse’s inside hind is leaving the ground and bending under his body. Now is the time to apply an effective parade that can influence your horse to jump under even more at canter. This moment is a fraction of a second after you will have applied the outside parade, because as already mentioned, the horse’s hindlegs leave the ground very close together.
Ride canter to the right on the circle. Once you have felt the natural application of the outside parade concentrate on applying an inside parade. Feel your seat come forward in the saddle, apply the parade now. As your seat comes back, relax the aids.
Try applying the parades every stride. Then relax your horse and take a break before changing the rein and trying the same on the left rein.
EXERCISE 4
It is also essential to master the alternate application of the parades at both walk and trot, as well as canter. Begin at the walk which is slower, and therefore, easier.
Do not try alternate parades until you have established the inside parade. However at walk this should not take longer than a few days at most.
Ride on the circle to the right at medium walk. Apply the established inside parades every stride and gradually phase in the outside parade. First we must determine just when the horse’s outside hindleg is leaving the ground. If you cannot feel this through your seat glance at the horse’s shoulders again. His outside hind will be coming off the ground when his outside shoulder is back as far as it can go. Apply the outside parade now. Relax it again as the hindleg comes groundwards, and then apply it in the next stride when the horse’s left shoulder is back again.
Remember when you are applying a half parade on one side, you must maintain light but firm contact on the opposite rein. This is a supporting rein aid and prevents the horse from turning his head, and corrects the tendency of some riders to saw on the reins. You will soon pick up the rhythm in time with the horse’s movement and find you are coordinating the aids without difficulty. Check the full sequence with our illustrations – this is the correct way to ride walk.
Not only do we have to apply alternate aids when the horse moves forward in walk, trot and canter, we also have to apply alternate aids in all lateral work and the rein back. This is because in lateral work the horse still moves his hind legs alternately. Even in the most advanced competition dressage we never ask the horse to jump forward with his hindlegs together, so if we want to influence him as efficiently as possible we must never apply our legs simultaneously. We must only apply them alternately in harmony with his movement. Whether it is leg yield, turn on the forehand or haunches, shoulder in, travers, renvers or half pass – alternate aids are necessary.
EXERCISE 5
Gradually the exercises are becoming more demanding. Once you have established the application of the inside parade at sitting trot it is time to introduce the alternate parades. But remember, even the most diligent rider will take 6-8 months to establish the inside parade at trot. Don’t begin this exercise until you have clearly established the inside parade.
To begin with, only concentrate on applying an outside parade. Momentarily forget about the inside parades. Take up a circle at working trot sitting on the right rein. The moment is ripe to apply the outside parade when the horse’s left outside hindleg is leaving the ground. By now your feeling should be established but if you are not sure when this moment occurs glance at his inside shoulder. When it is moving forward, it is time to apply the outside parade. Practise the coordination. Support your application with a firm inside rein contact to prevent your horse from swinging his head from side to side.
Once you’ve got it and can parade outside every stride, add the inside parade. Feel the coordination. Check your sequence with the illustrations.
Again I want to emphasise that you must not expect to master the application of the parade perfectly at the first attempt, or even the second, or third. Think of the little child learning to write. It took him hours and hours to master the basics of forming single letters on paper before he could even join them together to write words. His first attempts were clumsy and slow. But through daily practise and corrections from his teacher, he began to write faster; with more precision and to be able to join the letters together… he mastered the alphabet eventually.
The same is true of the alphabet of riding: the parade. Years and years of past experience in the saddle will only be of limited help to you now. Certainly you will have a better balance and seat. These are a precondition of being able to apply correct aids. But you will still have to work through the exercises and use the help of a good teacher to master the skills of applying a true parade. It will take perseverance, determination and understanding to perfect the coordination. Then you will need time and still more exercises to develop the feel that will guide you to instinctively know in what intensity to apply the aids.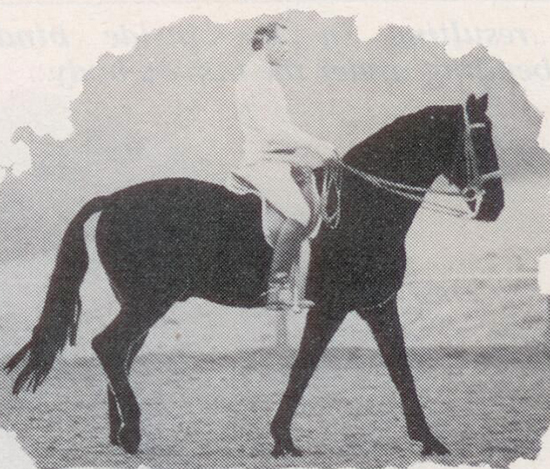
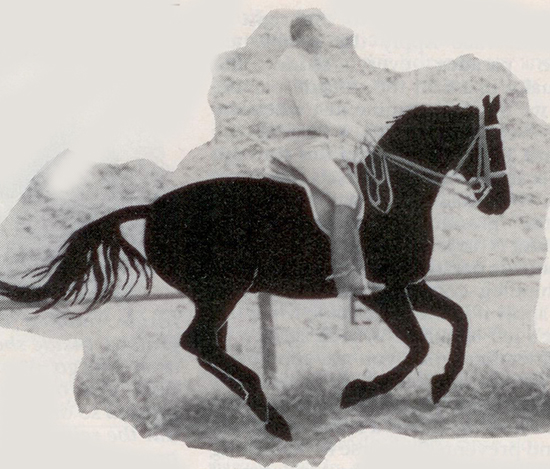
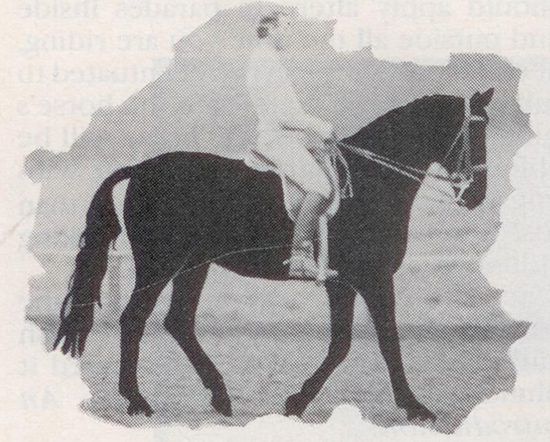
Inside hindleg begins to leave the ground. Inside shoulder is back as far as it can go. Apply the inside parade now. The outside hindleg is on the ground so outside aids will be passive, but the rein contact must be steady to prevent the horse’s head from turning.
Inside hindleg reaches highest point and comes to the ground. Inside foreleg comes forward. Relax inside aids. Outside hind is still on the ground. Outside aids still passive.
Outside hindleg leaves ground. At this moment the inside hindleg is on the ground so the inside aids are passive but the rein contact will be supportive towards the outside parade.
Outside hindleg has reached the highest point and is coming down. Outside foreleg comes forward. Relax outside aids. Inside hind is still on the ground so inside aids are still passive. Sequence will now begin again.

EXERCISE 6
Learning to apply the parades at rising trot often causes the most problems for experienced riders. This is because they are so firmly entrenched in their old habits and they cannot to alter to the correct technique. At rising trot, most riders keep a firmer rein contact and apply both their legs together during the sitting phase. As they rise they remove their legs, only to plonk them against the horse’s side as they sit. At this moment – providing the rider is on the correct diagonal – the horse’s inside hindleg is on the ground and the rider cannot influence it. The outside hindleg, however, is off the ground and the rider’s leg aid pushes it forward. This will cause the horse to try and run faster, despite the rider’s firm rein contact.
As we already know, the hindleg we can best influence is the inside one. So we must try and apply our inside parades at the moment we can beneficially influence this leg. We have to change our habit of applying the leg aids simultaneously during the sitting phase.
The correct moment to apply the inside parade is when you are rising out of the saddle. At this time the horse is lifting his inside hind leg off the ground.
To begin with, as in the earlier exercises, only concentrate on applying the inside parade. Every time you rise, parade inside, and don’t apply any aids when you sit.
Many experienced riders find this exercise extremely frustrating. They have been applying both their legs together for so long when they sit that they have trouble breaking the habit. After trying for a time, some give up. It is their own mistake to do so, and they will suffer through not being as effective riders as they could be.
Once you have established the inside parade at rising trot, it is time to add the outside parade – but, just like at sitting trot, don’t try to coordinate both until you have perfected the inside parade, and this will probably take several months.
After reading all my explanations I hope you are now confident that there is not a trace of mystery surrounding the parade – or, as it is often called – the half halt.
Also, I hope you will now realise that, other than in a few exceptions (for example – free walk on a loose rein where the rider can only influence with leg and seat) the aids are always applied in conjunction with each other. It is incorrect to use only one aid in isolation.
Many riders are inclined to use rein aids without applying leg or seat. Rein aids used alone have nothing to do with parades, or even effective application of the aids. They only have an isolated pulling effect on the horse’s mouth which is uncomfortable for him, encourages resistances, and throws him on his forehand. It has no effect on the hindleg, or engagement, or rounding, or anything beneficial in the horse’s preparation. Horses which are ‘pulled together’ move with short necks, dragging their hindlegs along out the back end. The rider has minimal control, and ends up pulling the horse more and more in a futile attempt to stop him from running. Never confuse the true parade with a ‘checking with the hand’.
If a rider only uses leg aids without the support of seat and rein, other problems occur. The horse will move without rhythm in an incorrect, stretched outline. He will fall on his forehand and run, probably resembling a hot dog more than a horse.
How much leg, seat and hand is required is a matter of feeling. A teacher cannot tell you to apply precisely so many kilograms of pressure per square centimetre when you apply an aid. They can only explain, and demonstrate during lesson. You must learn through the exercises, through trying and trying, and gradually your feeling will improve. You must also use the feedback from your horse’s reactions. Riding involves intelligent, two-way communication. Your horse can indicate in many ways whether your aids were correct or otherwise for the given situation. It is up to you to observe his responses and to use them towards developing your feel.
I would also like to clarify another important point. I have often heard trainers advise their pupils to ‘give inside’ with their hand immediately after applying a half halt. This is correct, but it is expressed in a misleading way. ‘The ‘giving’ must be the second phase of the parade and it is not confined to the rein aids.
The first phase of the parade is the active driving with leg and seat into the supporting hand. The second phase is the relaxation of the hand and the cessation of the driving leg and seat aids. During the ‘give’ phase the rein does not become slack. This is incorrect and will result in the horse experiencing an uncomfortable jag in the mouth when the contact is resumed. To be correct the rider maintains a steady contact with the horse’s mouth but the rein becomes passive. In the same way. The rider’s legs do not bounce off the horse’s sides, nor does his seat jump from the saddle. The leg and seat simply become passive and remain in position, poised in readiness for the next application.
Which leads to the next question. How often should the parade be applied? When I was younger I had a highly respected trainer who used to say: “If, when you are riding on the long side, you apply a hundred half parades, it will still not be enough’. He was of course, only speaking figuratively – since there is not enough room along the long side to apply that many parades-but his meaning should be clear. I must admit that I did not understand the meaning of his words then as I do today. You have to use the parades the whole time. You have to ride your horse every stride.
This means to be able to ride your horse in a correct frame, to maintain rhythm, collection and roundness with engagement of the hindquarters, you have to use the parades. Through the parades and through riding every stride you will be able to improve your horse and ask more of his performance. A horse that is consistently asked to produce his best will be conditioned to do so. He will be willing and able to maximise his performance with minimum effort. Through the parades you can instill in your horse the desire to do better than before. This is the way to gymnastic a horse, to work at improving the purity of his paces until he can perform to the ultimate extent of his natural abilities.
The intensity of the parades varies in different circumstances – pace, degree of collection, attentiveness of the horse-and from horse to horse. There are also several different subtleties or sub-types of parades. For example there is a type of parade especially for working paces and all types of lengthening. This is where leg and seat are very dominant and you receive the full energies in your hand.
Then there is another type of parade, where the driving aids are shorter but applied more energetically, with a short sharp tap of the leg. This form is primarily used in the collected paces. The hands receive the full energy and have an important role in directing it to flow back the way it came to act upon the hindlegs and cause a very definite bending.
In general the intensity and frequency of the parades can vary between inside and outside, and the two parades are applied for different reasons. The inside parade has largely a gymnastic aim. This is because the inside hindleg, through its position, can be pushed under the horse’s body mass easier than the outside leg, It can bend in the direction of the horse and the rider’s centre of gravity, and be made to carry more weight. In this way, the inside parade is primarily used to gymnastic the inside hind.
The outside parade has three main aims. It is always used before a new exercise or movement commences to make the horse attentive. Secondly, it is always used to help balance the horse better. For example, you are riding at collected trot and want to execute a volte (circle of 6-8 metres). You apply a parade outside to prepare your horse for the new movement. Eventually your horse will become so conditioned to this preparatory parade, that his response will become like a reflex. He will become increasingly attentive, ready for something different and poised to respond to your next command. The outside parade, through its bending influence on the horse’s hindleg, will cause it to engage better. It will carry more weight and shift the centre of gavity of the horse and rider back, therefore helping the horse improve his balance.
Imagine for a moment that you are riding a transition direct from walk to canter. However you failed to prepare the horse ·with an outside parade and just applied your aids for canter. Your horse got a surprise at these sudden aids and rushed forward into an unbalanced trot instead of cantering. He trotted faster and faster on his forehand until he finally fell into a clumsy canter. Now be honest… how many times has this happened to you? I bet the answer is not once, not twice, but hundreds of times. Now if it happens again, you will know immediately that you have failed to prepare your horse. You have forgotten to apply the outside parade.
Try and consistently introduce the outside preparatory parade to your riding. Every time you are going to ride a new movement, prepare your horse with the outside parade. Absolutely everything must be prepared for in this way. The preparatory parade is slightly stronger than the usual outside parades so the horse can distinguish it. Any time you feel your horse is losing his balance, one or several parades outside will help him regain his poise.
Thirdly, parades outside are important in collection. Although you should apply alternate parades inside and outside all the time you are riding, at collection they can be accentuated to fully engage and bend both the horse’s hindlegs. In this way, the horse will be able to move in true collection with engagement and elevation, rather than just shortening his frame and taking stilted steps as is so often seen.
It is obvious how important the parades are. The highly regarded British author, Anthony Crossley expressed it bluntly in his book, Dressage – An Introduction: “An eminent figure in international dressage was once asked what he thought was the chief cause of Great Britain’s poor performance in the dressage discipline. He replied without hesitation and in three words: ‘no half halts’. They are, he added, the quintessence of dressage.”
Riding in Australia and New Zealand is heavily influenced by Great Britain, especially through Pony Club – so Australians should take careful note of this statement. Riding begins and ends with the parades or half halts. You need them for self carriage and collection, to improve balance, to establish and maintain rhythm, and to execute transitions. The horse moves in the correct outline through the parades and they create and direct impulsion… all requirements for improving the purity of the horse’s paces.
You need the parades to prepare and execute the different movements from the simplest exercise through to the most difficult. You have to use them all the time and for everything.
If you are unable to apply them, you cannot really ride. You are like the child who can scribble, or at best, draw pictures. But he cannot write or read because he does not know the alphabet.
Let us learn it!
-Christian Thiess
This article first appeared in the April 1986 issue of THM.
Here are some of the stallions IHB offers in Australia, there are lots more, go to www.ihb.com.au
![]()
Thank you – Thank you – Thank you!
Thank you THM and of course the late CT. Great article to re-run”
Thank you THM for a wonderful article how great to have this reinforced into my brain. Love, love, loved it.
This article absolutely changed my life years ago when I did not have an instructor. Great to find it online, I still have the original Horse Magazine too. Will share with friends…
Ok so now things make sense hopefully I will be able to actually work out how to do it before I am too old to ride!! Sorry to all my past and present instructors who have no doubt tried to explain this to me!!!’
OMG, Great article. This can and should be used in all types of disciplines. I ride barrel horses and totally understand the concepts and how to apply.
Finally an article that really explains half-halt… i started in dressage and do reined cowhorse now, my instructor needs to read this. She thinks half halt means you literally slow the forward down (WRONG) on your horse- if she only really knew that she can only get from her horses what she gets is from all her own half halts!!!!